Master ASP.NET Core Identity in .NET10: Secure Web APIs
Tutor: Frank Liu
Cookie Vs Token
Cookies can carry authentication tokens back and forth between the browser and server within the domain boundary, which it cannot pass through. As such a single sign on between tow or more domains cannot use the cookie approach.
If we want to have cross-domain authentication we use a toke. A token is typically just a string stored in the header of our HTTP request and response, so can travel across domains.
Cookies can be useful, but this comes with challenges if the Browser and API are not in the same domain.
Typically you would use a cookie for the browser side and a token for the Web API. Remember, a Web API is not oly used by browsers, but also other devices such as other APIs.
Create and Consume a Web API Endpoint
We start by creating a new project in the solution using the ASP.NET Core Web API template.
The Project can be called WebAPI, use .Net Core 10, Authentication type should be set to None (since we want to learn how to create this!) and https can be checked.
Configure the debug to run multiple projects, select both with the Web API starting first. Run the project to check everything works, then to test the scaffolded controller open the file /WebAPI.http and click on send request.After a couple of moments the example WeatherForecast endpoint should return a result set.
Access and Call the Unprotected Example Endpoint
We want to add a reference to this endpoint to the HrManager page. In order to access the web API endpoints we use HTTP client factory, so back in the Web Application's Program.cs file, anywhere before the builder.Build() call, add the following:
builder.Services.AddHttpClient("OurWebAPI", client =>
{
    client.BaseAddress = new Uri("https://localhost:7204");
});
Be sure to replace the BaseAddress URL with the value in the launchSettings.json file for the Web API project.
With the HTTP client factory configured we need to be able to call this on the HrManager page. Add a constructor to the code-behind to allow this HttpClientFactory to be injected:
private readonly IHttpClientFactory _httpClientFactory;

public HrManagerModel(IHttpClientFactory httpClientFactory)
{
    _httpClientFactory = httpClientFactory;
}
Now in the OnGet method we can use this HttpClientFactory to actually create an HttpClient instance:
public void OnGet()
{
    var client = _httpClientFactory.CreateClient("OurWebAPI");
}
Be sure to specify the same name as we added to the program.cs file (in this case "OurWebAPI", possibly better stored as a constant).
Before we use this to call the endpoint, we need a DTO class defined to hold the expected results. Add the file DTOs/WeatherForecastDTO.cs:
namespace WebApp_UnderTheHood.DTOs;

public class WeatherForecastDTO
{
    public DateOnly Date { get; set; }

    public int TemperatureC { get; set; }

    public int TemperatureF { get; set; }

    public string? Summary { get; set; }
}
(This is literally just the class structure from the API project, except the TemperatureF field which just holds a value rather than needing to be calculated.)
Now we can use this DTO when we call the endpoint and receive data back:
public List<WeatherForecastDTO>? WeatherForecastItems { get; private set; }

...

public async Task OnGetAsync()
{
    var client = _httpClientFactory.CreateClient("OurWebAPI");
    WeatherForecastItems = await client.GetFromJsonAsync<List<WeatherForecastDTO>>("WeatherForecast");
}
Now we need to update the page to display this data:
@if (Model.WeatherForecastItems == null || !Model.WeatherForecastItems.Any())
{
    <p>No weather forecast data available.</p>
}
else
{
    @foreach (var item in Model.WeatherForecastItems)
    {
        <table class="table table-bordered table-striped">
            <thead>
                <tr>
                    <th>Date</th>
                    <th>Temperature (<sup>o</sup>C)</th>
                    <th>Temperature (<sup>o</sup>F)</th>
                    <th>Summary</th>
                </tr>
            </thead>
            <tbody>
                <tr>
                    <td>@item.Date.ToShortDateString()</td>
                    <td>@item.TemperatureC</td>
                    <td>@item.TemperatureF</td>
                    <td>@item.Summary</td>
                </tr>
            </tbody>
        </table>
    }
}
JWT Introduction
There is no difference in the process between using a cookie or a Json Web Token (JWT), both are transmitted to and from the browser/server in the header, but they are created differently, essentially we follow the same process but generate a Token instead of a Cookie.
The token is a string that can be carried by the request and response. The Json web token itself is a string, but it has three different parts separated by two dots:
- The first part is the hashing algorithm. (Base-64 clear text)
- The second part are the claims that contain the user information. (Base-64 clear text)
- The third part is the hashed result of the claims.
HashingAlgorithm.Claims.HashedClaims
NOTE: No sensitive information should be included in the claims as these are easily decoded!
When you try to generate the Json web token, you take the claims and the hashing algorithm. The site will have a secret key to use in the signing process, so you apply this key to generate the hashed result. This is a one-way process, you cannot reverse the process ot get the actual claims.
To verify the token you take the existing token, run it through the same process again (use your secret key to sign) to produce another hashed claims.
These two hashed claims are compared, and if equal we know the JWT is valid.
This works as long as the secret ket remains private, as long as a hacker (for example) does not have access to this key, they cannot recreate the JWT, and it wil therefore fail validation.
JSON Web Tokens only contain Claims nd an Expiry DateTime, not identities or Principles.
Typical JWT Flow
Token authentications are usually used between different servers, if you only have one server and you have protected API endpoints, then you can use cookie authentication.
The typical flow for when JWTs are used follows this structure from a high-level:
- A user will access a web application through a browser.
- The Web App calls an authentication provider to verify the credentials of the web application (so basically a user).
- The authentication provider returns a token back to the web application.
- The web application will try to access an API resource, sending the token in the authorisation header along with the request.
- The Web API verifies the token against the authentication provider.
sequenceDiagram
    actor User
    User->>WebApp: Performs action (cookie Auth)
    WebApp->>Authentication Provider:Validate Credentials
    Authentication Provider->>WebApp:Token
    WebApp->>API:Call Endpoint
    API->>Authentication Provider:Verify Token
    Authentication Provider->>API:Token
    API->>WebApp:Return Response
    WebApp->>User:Return Response
If we create all the services ourself we do not have to verify the key in each API, but typically (and especially with working with Azure, etc.) each step must verify the token:
sequenceDiagram
    actor User
    User->>WebApp: Performs action (cookie Auth)
    WebApp->>Authentication Provider:Validate Credentials
    Authentication Provider->>WebApp:Token
    WebApp->>API:Call Endpoint
    API->>Authentication Provider:Verify Token
    Authentication Provider->>API:Token
    API->>API 2:Call Endpoint
    API 2->>Authentication Provider:Verify Token
    Authentication Provider->>API 2:Token
    API 2->>API:
    API->>WebApp:Return Response
    WebApp->>User:Return Response
Generating a JSON Web Token
For this example we're going to combine the authentication provider with the web API, which is also a valid scenario. In this situation both the resource and the authentication provider are sitting together.
The Web Application will be the client of the Web API, the Web API will verify the credentials of the Web Application. If verified we generate the JWT.
Because we want to verify the credential of our client application (the Web App), we need to create another endpoint in our server application (the API).
Create a Credential class in /Models to hold the credentials we will be processing:
namespace WebAPI.Models;

public class Credential
{
    public string UserName { get; set; } = string.Empty;
    public string Password { get; set; } = string.Empty;
}
Create a new Empty API Controller named AuthController. We will implement an HttpPost method to send the details through the Http body as this is safer at this stage.
Add the following to the file:
using Microsoft.AspNetCore.Mvc;
using System.Security.Claims;
using WebAPI.Models;

namespace WebAPI.Controllers;

[Route("[controller]")]
[ApiController]
public class AuthController : ControllerBase
{
    [HttpPost]
    public IActionResult Authenticate([FromBody] Credential credential)
    {
        // For demonstration purposes, we will just check if the username and password are "admin" and password
        if (credential.UserName == "admin" && credential.Password == "password")
        {
            // Create the security context and set the user as authenticated
            var claims = new List<Claim>
                {
                    new Claim(ClaimTypes.NameIdentifier, credential.UserName),
                    new Claim(ClaimTypes.Email, $"{credential.UserName}@somedomain.com"),
                    new Claim("Department", "HR"),  // Custom claim for authorisation policy.
                    new Claim("Admin", "true"),  // Custom claim for admin. Value can be anything, but good to have it make sense.
                    new Claim("Manager", "true"),  // Custom claim for manager. Value can be anything, but good to have it make sense.
                    new Claim("EmploymentDate", DateTime.UtcNow.AddYears(-1).ToString("yyyy-MM-dd"))
                };

            var expiresAt = DateTime.UtcNow.AddMinutes(10);

            return Ok(new
            {
                Token = GenerateToken(claims, expiresAt),
                ExpiresAt = expiresAt
            });
        }

        ModelState.AddModelError("Unauthorized", "Invalid username or password.");
        var problemDetails = new ValidationProblemDetails(ModelState)
        {
            Status = StatusCodes.Status401Unauthorized,
            Title = "Unauthorized",
            Detail = "Invalid username or password."
        };

        return Unauthorized(problemDetails);
    }
}
Now we need to generate the GenerateToken method (still in the same class). Before we do this first add the NuGet package Microsoft.IdentityModel.JsonWebTokens to the Web API project.
With this in place we will call add the following code:
private string GenerateToken(List<Claim> claims, DateTime expiresAt)
{
    var secretKey = _configuration["Jwt:Secret"] ?? string.Empty;

    var tokenDescriptor = new SecurityTokenDescriptor
    {
        Subject = new ClaimsIdentity(claims),
        Expires = expiresAt,
        SigningCredentials = new SigningCredentials(
            new SymmetricSecurityKey(Encoding.UTF8.GetBytes(secretKey)),
            SecurityAlgorithms.HmacSha256Signature),
        NotBefore = DateTime.UtcNow
    };

    var tokenHandler = new JsonWebTokenHandler();
    return tokenHandler.CreateToken(tokenDescriptor);

}
The SecurityTokenDescriptor describes how the token should be generated. SigningCredentials is basically just signing credential class instance which needs a secret key and hashing algorithm. We should get the secret key from user secrets, so that needed to be injected in the constructor which is done from via the usual IConfiguration class, since secrets are just extensions to the appsettings.json file that won't get saved to version control:
public AuthController(IConfiguration configuration)
{
    _configuration = configuration;
}
and the value added to the secrets.json file (via Manage User Secrets):
{
  "Jwt": {
    "Secret": "YourSecretKeyForJwtTokenGeneration"
  }
}
Protecting the Web API Endpoint
Now we have the JWT being created in the AuthController, we can protect our Web API endpoint in WeatherForecastController.
The easiest way is to use the [Authorize] attribute on the whole controller:
[Authorize]
[ApiController]
[Route("[controller]")]
public class WeatherForecastController : ControllerBase
{
  ...
}
This specifies that that as long as the user has the correct credential to authenticate, then the user would is able to access the controller, the claims are not considered.
We can test this using PostMan. First we must to get a JWT from the auth controller:
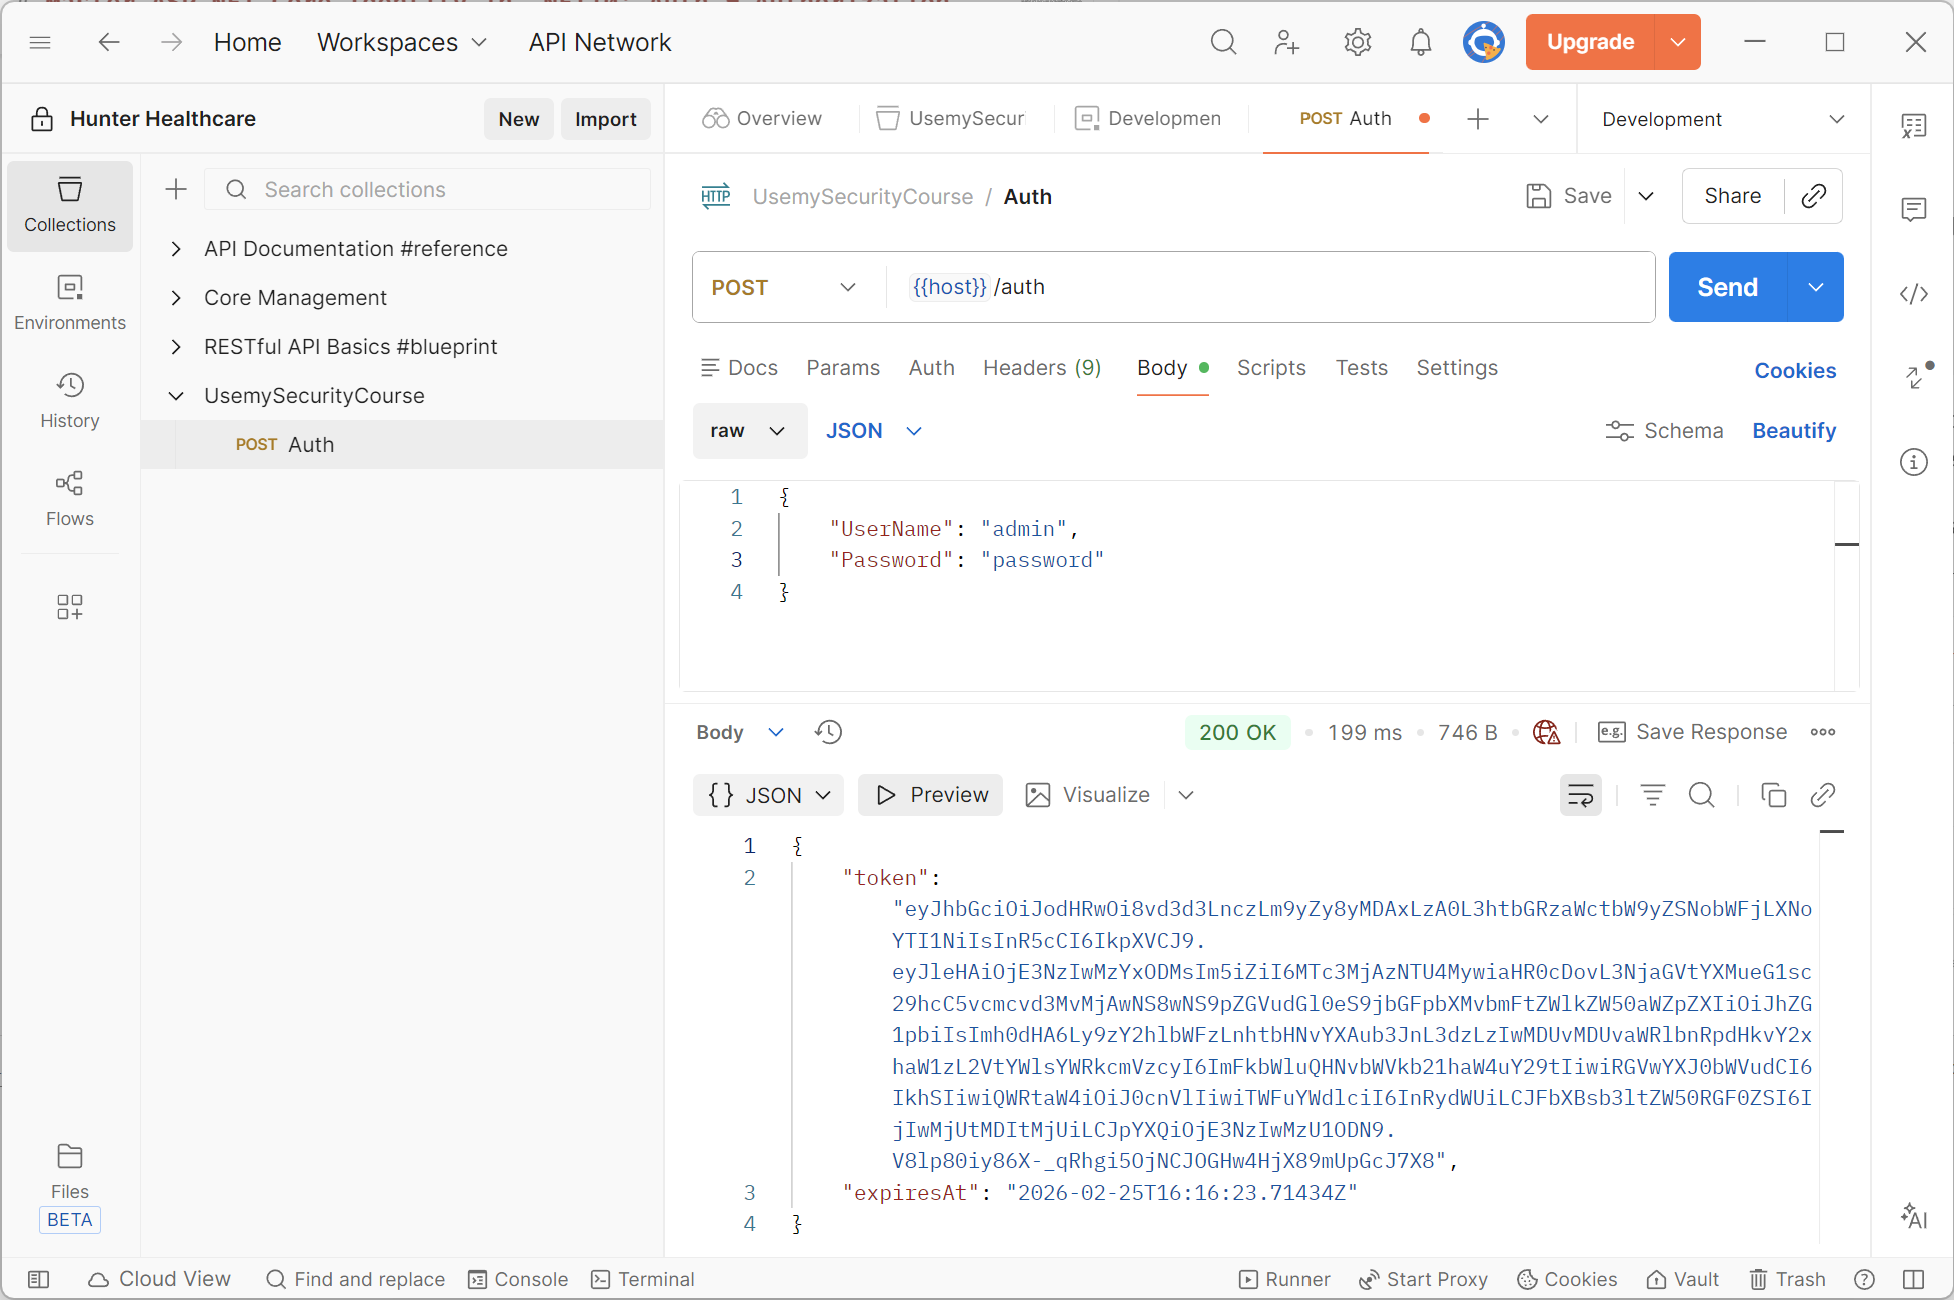
This will return us a valid JSON Web Token. We can now try calling the GetWeatherForecast endpoint with this token:
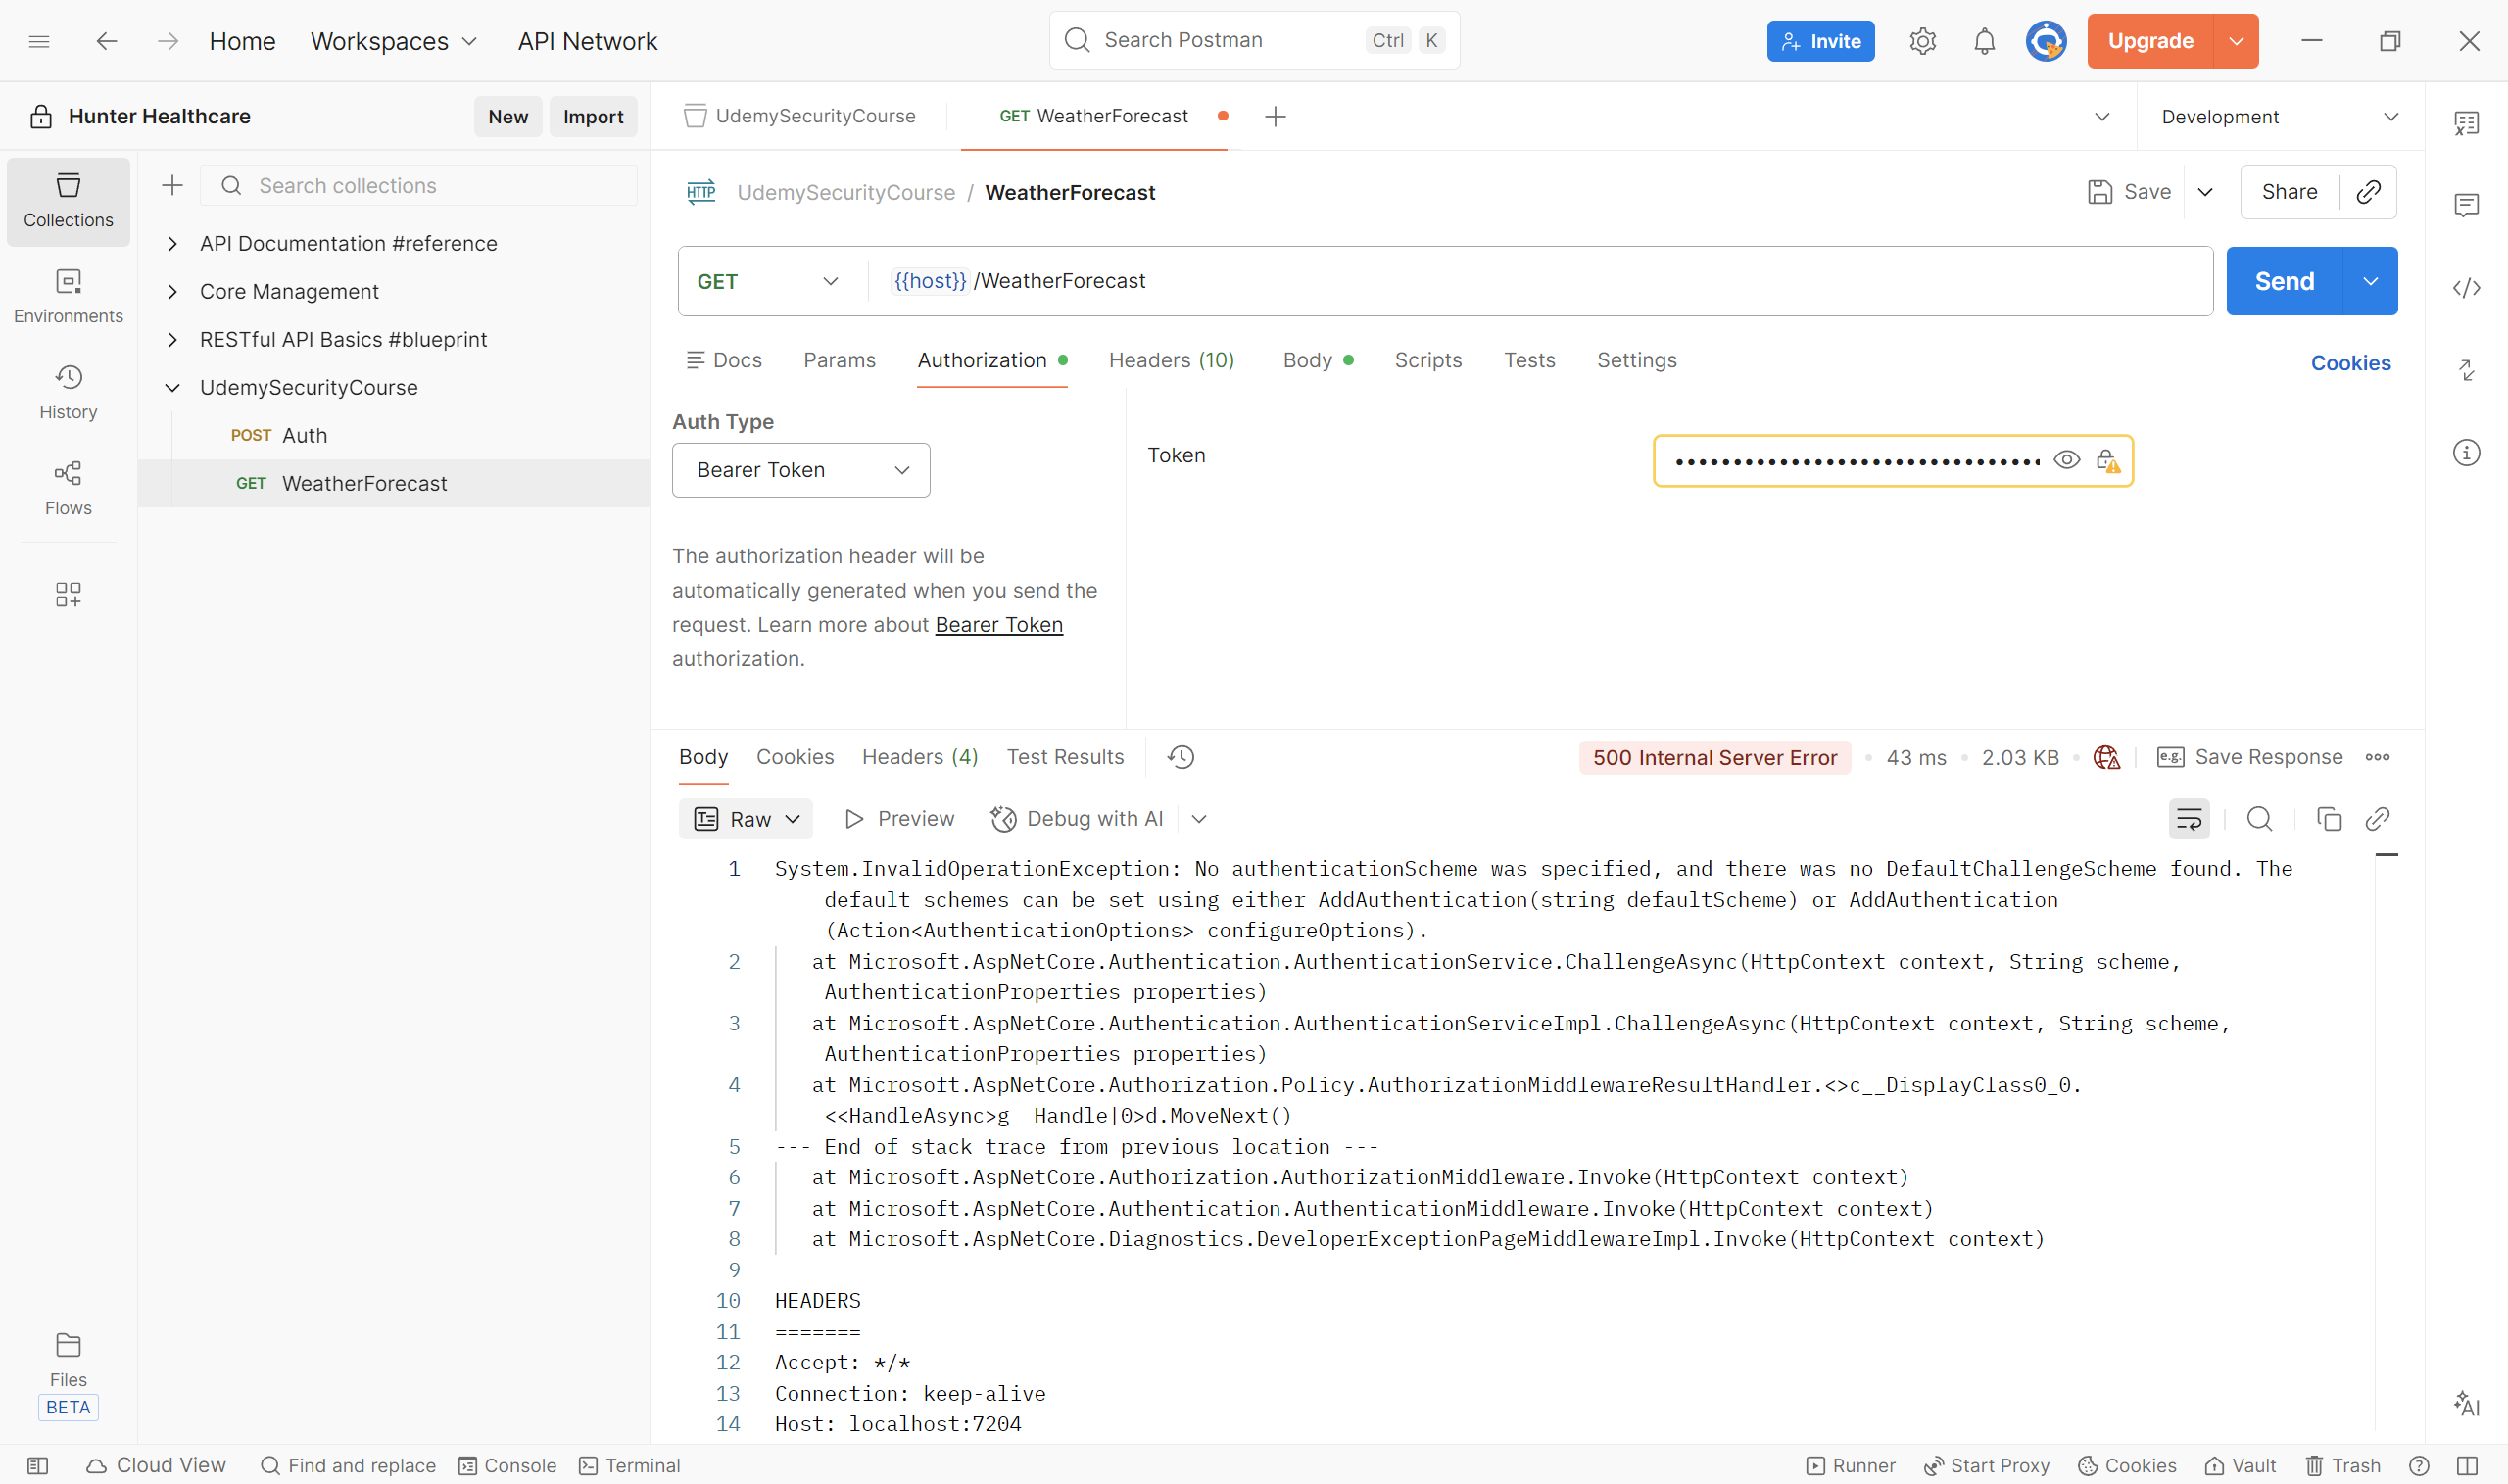
This fails as we haven't set up the middleware in the Web API to read the token.
Adding Authentication Middleware to the API
The API project needs to add the Authentication Middleware to the pipeline so that we can then implement the Authentication Handler as we did for the cookie.
First we need to add the NuGet package Microsoft.AspNetCore.Authentication.JWTBearer to this project. With this installed edit the API Program.cs as:
...

builder.Services.AddAuthentication()
    .AddJwtBearer(options =>
    {
        options.TokenValidationParameters = new Microsoft.IdentityModel.Tokens.TokenValidationParameters
        {
            ValidateIssuer = false,
            ValidateAudience = false,
            ValidateLifetime = true,
            ValidateIssuerSigningKey = true,
            IssuerSigningKey = new Microsoft.IdentityModel.Tokens.SymmetricSecurityKey(
                System.Text.Encoding.UTF8.GetBytes(builder.Configuration["Jwt:Secret"] ?? string.Empty)),
            ClockSkew = TimeSpan.Zero
        };
    });

var app = builder.Build();

...

app.UseAuthentication(); // This must come before UseAuthorization
app.UseAuthorization();
app.UseAuthentication() adds the middleware, and must come before app.UseAuthorization().
We set the configuration for the middleware via AddAuthentication(), specifically for the JWT by calling the AddJwtBearer method within, since we will be adding a JWT Bearer type token authentication handler. We configure that to validate against the claims and the signing credentials (as discussed above). Remember it is a one way key, we do this so that the token can be generated based on the claims payload and the signing credentials. We do the same process and compare the hashed results as described in the JWT Introduction section.
We want to validate the lifetime of the token as we don't want to allow expired tokens.
Also consider setting ValidateIssuer and ValidateAudience if the situation requires this, usually this is not needed when we are supplying the entire stack.
Setting ClockSkew = TimeSpan.Zero disables the default value of five minutes, the most strict validation since we'rer running on the same server. If there were time zone differences this may cause an issue, in which case either use the default or specify another value that works.
The most important of these setting is ValidateIssuerSigningKey = true to ensure this takes place.
Of course, the signing key we specify must be exactly the same as the key used to create the token originally.
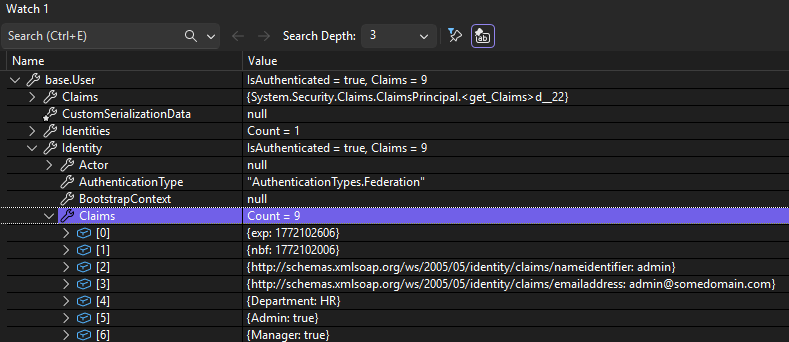
Now when we run in Postman, validate with the Auth endpoint and supply the new token as the Bearer for the WeatherForecast endpoint, we successfully get the list of forecasts back from our endpoint. Setting a breakpoint on HTTPGet endpoint in our weather controller allows us to inspect the full list of claims in the debugger watch window:
NOTE: In recent .Net version you do not have to specify the name of the expliti schema to use in AddAuthentication(), however to be more explicit you can specify your authentication scheme in different ways, either by adding the name as the first/default parameter in AddAuthentication(), or with:
builder.Services.AddAuthentication(options =>
{
    options.DefaultAuthenticateScheme = JwtBearerDefaults.AuthenticationScheme;
    options.DefaultChallengeScheme = JwtBearerDefaults.AuthenticationScheme;
    options.DefaultSignInScheme = JwtBearerDefaults.AuthenticationScheme;
})
But without this it's still understandable what is going on so it's fine to leave this part empty, but it might be considered more obvious if you leave it in.
Consuming a Protected API EndPoint
Now we have all that set up, we need the Web App to be able to call the protected endpoint after authentication. Currently the bearer token is not being sent.
We first need to authenticate against the API endpoint, so we post the login credentials to the Auth endpoint to get the JWT, enabling us to pass it to the endpoint we want to call to prove we are authenticated.
Create a new class Authorization/JsonWebToken in the web app to deserialise the response from the Auth endpoint we will shortly add:
using System.Text.Json.Serialization;

namespace WebApp_UnderTheHood.Authorization;

public class JsonWebToken
{
    [JsonPropertyName("token")]
    public string AccessToken { get; set; } = string.Empty;

    [JsonPropertyName("expiresAt")]
    public DateTime ExpiresAt { get; set; }
}
In the HrManager.cshtml.cs file, update as follows:
public async Task OnGetAsync()
{
    var client = _httpClientFactory.CreateClient("OurWebAPI");

    // Simulate login to get the cookie
    var response = await client.PostAsJsonAsync("auth",
        new { UserName = "admin", Password = "password" });
    response.EnsureSuccessStatusCode(); // Ensure the login was successful otherwise throw an exception
    string jwtString = await response.Content.ReadAsStringAsync();
    var token = JsonSerializer.Deserialize<JsonWebToken>(jwtString);

    client.DefaultRequestHeaders.Authorization = new AuthenticationHeaderValue(
        "Bearer", token?.AccessToken ?? string.Empty);

    WeatherForecastItems = await client.GetFromJsonAsync<List<WeatherForecastDTO>>("WeatherForecast");
}
This will get the JWT and attach it to the request header when calling the API, so the API call should now succeed.
Creating and Storing the JWT for the Session
The token we created above gets recreated every time the endpoint (or others in the future API) are called, so it would be better to only create this when required (i.e. it doesn't exist or has expired) and reference an existing valid instance if available.
Web applications are stateless, so we need to use a store for our created token. We can save this to something like a database in the backend, however a better solution is to store it in a cookie for the duration of the session.
Enabling Session in the Web Application
Our session is going to be maintained by a cookie, so that's really what we are configuring here. In the Web App Program.cs after the HttpClient is configured, add the following:
builder.Services.AddSession(options =>
{
    options.IdleTimeout = TimeSpan.FromMinutes(20);
    options.Cookie.HttpOnly = true;
    options.Cookie.IsEssential = true;
});
Also add app.UseSession(); to the middleware after app.UseAuthorization().
Now back in the HrManager.cshtml.cs file, update as follows:
public async Task OnGetAsync()
{
    JsonWebToken token = await GetOrCreateJWT();

    var client = _httpClientFactory.CreateClient("OurWebAPI");
    client.DefaultRequestHeaders.Authorization = new AuthenticationHeaderValue(
        "Bearer", token?.AccessToken ?? string.Empty);

    WeatherForecastItems = await client.GetFromJsonAsync<List<WeatherForecastDTO>>("WeatherForecast");
}

private async Task<JsonWebToken> GetOrCreateJWT()
{
    // Get JWT from the cookie and set it in the HttpClient's Authorization header to call the API.
    var token = new JsonWebToken();

    var strTokenObj = HttpContext.Session.GetString("JWT");
    if (!string.IsNullOrEmpty(strTokenObj))
    {
        token = JsonSerializer.Deserialize<JsonWebToken>(strTokenObj) ?? new JsonWebToken();

        if (token == null || token.ExpiresAt < DateTime.UtcNow)
        {
            token = await Authenticate();
        }
    }
    else
    {
        token = await Authenticate();
    }

    return token;
}

private async Task<JsonWebToken> Authenticate()
{
    var client = _httpClientFactory.CreateClient("OurWebAPI");

    // Simulate login to get the cookie
    var response = await client.PostAsJsonAsync("auth",
        new { UserName = "admin", Password = "password" });
    response.EnsureSuccessStatusCode(); // Ensure the login was successful otherwise throw an exception
    string jwtString = await response.Content.ReadAsStringAsync();

    // Store in the session for future use
    HttpContext.Session.SetString("JWT", jwtString);

    var token = JsonSerializer.Deserialize<JsonWebToken>(jwtString) ?? new JsonWebToken();
    return token;
}
This essentially looks in the session cookie for an existing JWT. If one is found it returns it, if one isn't found it creates it, stores it in the session and returns it. If the one found has expired then a new one is created and stored before being returned.
Adding Authorization to a Web API Endpoint
Currently on our Web API endpoint, in the controller we are just denying anonymous identity:
[Authorize]
[ApiController]
[Route("[controller]")]
public class WeatherForecastController : ControllerBase
{
    ...
}
If we wanted to only allow access to Admin users we can add policy identification:
[Authorize(policy: "AdminOnly")]
[ApiController]
[Route("[controller]")]
public class WeatherForecastController : ControllerBase
{
    ...
}
Then we add this policy in the Program.cs file:
builder.Services.AddAuthorization(options =>
{
    options.AddPolicy("AdminOnly", policy =>
    {
        policy.RequireClaim("Admin");
    });
});
That's all we need. If we remove the "Admin" claim from the list (in AuthController), the page will still be able to be accessed in the Web Application, but the call to the API will fail so a 403 (Forbidden) response will be returned and shown on the page.
In the real would we would want to handle this situation gracefully and not just display this error.
If we had a more complex check we wanted to perform, then just like with the [HrManagerProbationRequirement](#A-More-Complex-Check) a custom requirement can be created in the Web API.
To create this create a new /Authorization and create custom requirements here as we did before.