Master ASP.NET Core Identity in .NET10: Auth & Authorization - Groundwork
Tutor: Frank Liu
Security Overview
At a high level:
Authentication Is the first step of the security process. Authentication prove you are who you say you are. Think of it like checking-in in an airport, you prove who you are by showing your passport, the staff authenticate that is you, and give you a boarding pass - analogous to a JWT Token or similar.
When you then try to board you flight you show your boarding pass and passport and the staff authorise you are allowed to board that flight.
Authentication verifies you are who you say yo are and generates a security context. The security context contains all the information about you that is relevant.
Authorisation verifies the security context satisfies access requirements.
So in a web app, the process of logging in (providing the username and password) is the authentication step. Successful authentication generates a security context. If it's cookie authentication then it generates a cookie, if it's token authentication then it generates a token, either way this contains the security context. This security context is passed to each page during navigation until that security context expires, and then you will lose your access to the web application.
Note: A cookie can be considered a piece of information that is stored in the header of the HTTP request and included in the response.
A cookie is a special type of information because it can only be shared within the same domain. The cookie is automatically passed backwards and forwards on the domain until the cookie expires.
Each page may have different access requirements and that's where the authorization comes in. The authorization process will look at your security context (deserialised from the cookie or token) and then applies those requirements against that security context to see whether your security context actually satisfies the requirements of accessing the page/resource.
Depending on the result, certain resources may not be accessible, resulting in an appropriate HTTP return code, usually:
- 403 - Not logged in.
- 401 - Not authenticated.
ASP.Net Core Basics
Web applications are based on HTTP requests. You have your frontend browser and your backend server, the frontend browser and the backend server send HTTP requests back and forth. The request and response basically just contain pieces of information that need to be passed back and forth between the frontend and the backend, the browser and server.
In the server we process the request and return a response. The processing has many steps such as:
- Authentication
- Authorization
- Exception handling
- Logging
- Routing
- Validations
In order to process this in a proper way, we can apply some software design patterns, in particular the "chain of responsibilities". This results in numerous functions connected together. Each function performs an operation and passes to the next. with the final message passing back to its caller on completion, until the message bubbles up to the first function and ultimately passes an HTTP response back to the browser.
This is what we call the middleware pipeline.
This middleware pipeline handles the separation of cross-cutting concerns. Each middleware in the pipeline takes a different responsibility like exception handling, logging, authentication, authorization, etc, with the last one usually responsible for processing the business logic (which has its own specific filter pipeline/logic for that specific request).
The Security Context
The security context contains all the information that the user has for security purposes. That includes the user information itself, username and all of the other type of user information like email addresses. These are actually encapsulated within one single object that is known as the claims principle in ASP.Net Core.
On a conceptual level, we have a principle object that represents the security context of the user. The principle contains one or many identities of the user. One person can have many types of identities, for example:
- You can be a student and you have a student card,
- You can also be an employee and you have an employee card,
- You can have your driver's license, and
- You can have an access card to your apartment building.
The next level is Claims. One identity then can contain many claims. Claims are basically a key value pair that carries your information. As an example a driver's licence will contain a name, birth date, photo, address, etc. All of these are considered claims (individually).
classDiagram
    Principal <|-- Identity 1 - Student
    Principal <|-- Identity 2 - Employee
    Principal <|-- Identity 3 - Driving Licence
    Identity 1 - Student <|-- Claim 1
    Identity 1 - Student <|-- Claim 2
    Identity 1 - Student <|-- Claim 3
    Identity 2 - Employee <|-- Claim 4
    Identity 2 - Employee <|-- Claim 5
    Identity 3 - Driving Licence <|-- Claim 6
    Identity 3 - Driving Licence <|-- Claim 7
    Identity 3 - Driving Licence <|-- Claim 8
    Claim 1: Name
    Claim 2: DoB
    Claim 3: Address
    Claim 4: Name
    Claim 5: Employee #
    Claim 6: Name
    Claim 7: DoB
    Claim 8: Licence #
A principal can have many identities, but usually we have just one identity which is the default identity.
The associated claims carry all the user information which we can make use of during authorisation. We apply the resource requirements to claims that need to be present.
Anonymous Identity
Note: For these examples I will be using the Visual Studio ASP.NET Core Web App (Razor Pages) template.
For the first project we create (WebApp_UnderTheHood) we keep the authentication type as "None" as we want to learn how to configure this manually.
As it stands the app we create will have no security and no login page.
The file \Pages\Index.cshtml is the application homepage and is not protected. Running the project will display this page with no issues. In the code-behind for this page setting a breakpoint in the OnGet() method and adding a watch for base.User (inherited from the base PageModel class) shows a value of IsAuthenticated = false. User is of type System.Security.Claims.ClaimsPrincipal with additional fields:
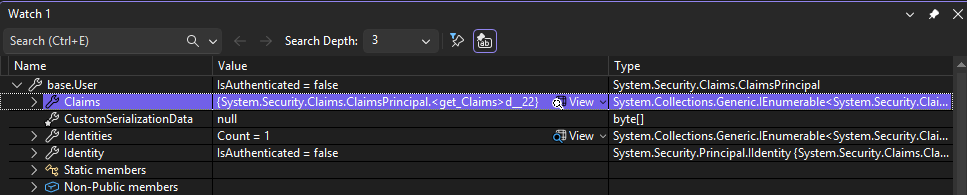
This is the security context, in this implementation is is the user principal.
The principal contains a list of identities, only one so far which is the primary identity. If we expand the identity we see a Claims list, which is currently empty:
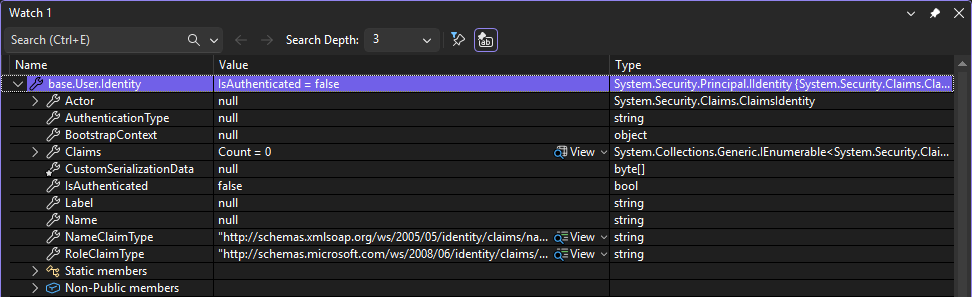
This is empty as we have no logged in user. Whether you have logged in or not, once the HTTP request goes into ASP.Net core, ASP.Net core creates a primary identity for you, which is right here regardless of whether you have logged in or not.
Your security context is the user object and this is your primary identity. If you haven't logged in, then you will still have your security context along with a primary identity, but in this case this is an anonymous identity.
Creating a login identity
We now need to add login code to create a logged in identity
We add an empty razor page to a new \Pages\Account\ folder named Login.cshtml. Add a model called Credential to the code-behind:
using Microsoft.AspNetCore.Mvc;
using Microsoft.AspNetCore.Mvc.RazorPages;
using System.ComponentModel.DataAnnotations;
using System.Net;

namespace WebApp_UnderTheHood.Pages.Account
{
    public class LoginModel : PageModel
    {
        [BindProperty]
        public Credential Credential { get; set; } = new Credential();

        public void OnGet()
        {
        }
    }
Create a new folder at the top level of the project (beside the Pages folder) called Authorization. This will hold all of our custom requirements. In this folder create the Credential class:
    public class Credential
    {
        [Required]
        [Display(Name = "User Name")]
        public string UserName { get; set; } = string.Empty;

        [Required]
        [DataType(DataType.Password)]
        public string Password { get; set; } = string.Empty;
    }
}
and update the view to
@page
@model WebApp_UnderTheHood.Pages.Account.LoginModel
@{
}

<div class="container border" style="padding: 20px;">

    <form method="post">
        <div class="text-danger" asp-validation-summary="All"></div>
        <div class="row mb-3">
            <div class="col-2">
                <label asp-for="Credential.UserName" class="form-label"></label>
            </div>
            <div class="col-5">
                <input type="text" asp-for="Credential.UserName" class="form-control" />
                <span class="text-danger" asp-validation-for="Credential.UserName"></span>
            </div>
        </div>
        <div class="row mb-3">
            <div class="col-2">
                <label asp-for="Credential.Password" class="form-label"></label>
            </div>
            <div class="col-5">
                <input type="password" asp-for="Credential.Password" class="form-control" />
                <span class="text-danger" asp-validation-for="Credential.Password"></span>
            </div>
        </div>
        <div class="row mb-3">
            <div class="col-2">
                <button type="submit" class="btn btn-primary">Login</button>
            </div>
            <div class="col-5">
            </div>
        </div>
    </form>
</div>
Now running the application and navigate to the new page, e.g. https://localhost:7261/Account/Login, to check it renders correctly.
We are now ready to implement the verification of credentials as well as generating the security context. Add the following method to the LoginModel class:
public async Task<IActionResult> OnPostAsync()
{
    if (!ModelState.IsValid)
        return Page();


    // For demonstration purposes, we will just check if the username and password are "admin" and password
    if (Credential.UserName == "admin" && Credential.Password == "password")
    {
        // Create the security context and set the user as authenticated
        var claims = new List<Claim>
        {
            new Claim(ClaimTypes.NameIdentifier, Credential.UserName),
            new Claim(ClaimTypes.Email, $"{Credential.UserName}@somedomain.com")
        };

        var identity = new ClaimsIdentity(claims, "MyCookieAuth");
        ClaimsPrincipal principal = new ClaimsPrincipal(identity);

        // Encrypt the principal
        await HttpContext.SignInAsync("MyCookieAuth", principal);

        // In a real application, you would set up authentication and redirect to a secure page
        return RedirectToPage("/Index");
    }
    else
    {
        ModelState.AddModelError(string.Empty, "Invalid login attempt.");
        return Page();
    }
}
Adding an Authentication Handler for the Cookie
We now need to register a sign-in authentication handler, required by IAuthenticationService when we call HttpContext.SignInAsync. We can choose either cookie, token or both types of authentication type handler.
flowchart TB
 subgraph Abstraction[" "]
    Au["Authentication"]
    IAu[IAuthenticationService]
 end
    c[Cookie]
    t[Token]
    Au --> IAu
    IAu --> c
    IAu --> t
We need to add the registration to the Program.cs file as a service:
// Add authentication type and configure cookie authentication
builder.Services.AddAuthentication()
    .AddCookie("MyCookieAuth", options =>
    {
        options.Cookie.Name = "MyCookieAuth";
        options.LoginPath = "/Account/Login";
        options.AccessDeniedPath = "/Account/AccessDenied";
    });
This adds cookie authentication to the handler. It handles the serialization of the security context then the encryption of the serialized result into a cookie. We don't have to worry about implementing the encryption, decryption, serialization, or deserialization. In the options all we really need to define is the Cookie.Name field, which must equal the correct names.
Looking at the developer tools, after signing in we can see the cookie has been created:
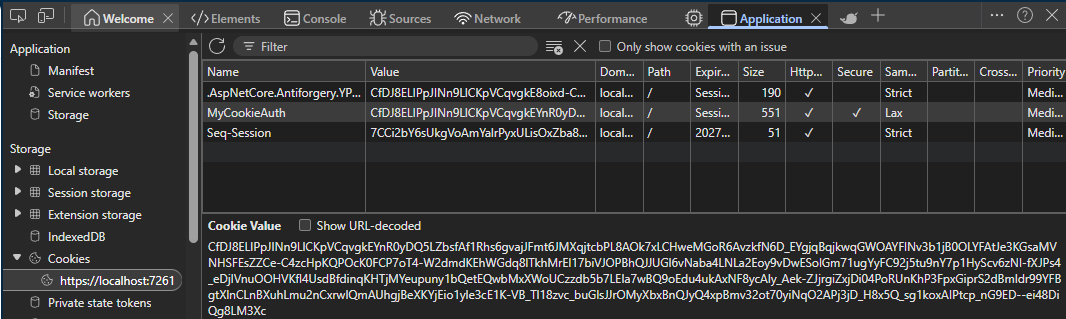
Read Cookie with Authentication Middleware
At this point we have generated the MyAuthCookie cookie with the content as the serialised security context, and sent that cookie back to the browser (as seen in the developer tool).
Whenever we navigate around the site the cookie will be sent in the request, and returned in the response (at least until it expires) so is available for us to use. We can see this by setting a breakpoint on the OnGet() method handler of the index page code behind:
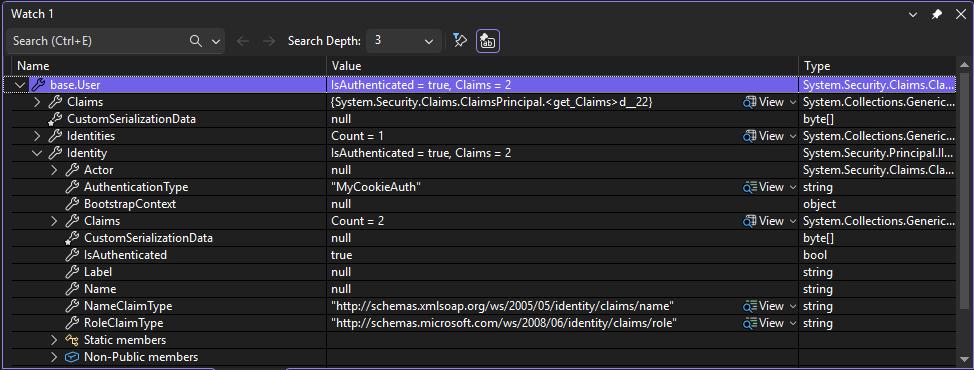
We can see we only have one identity in the Identities collection - this is the primary identity and is usually all we will have.
There are also two claims associated with this identity - one for the name and one for the email, as we specified earlier:
// Create the security context and set the user as authenticated
var claims = new List<Claim>
{
    new Claim(ClaimTypes.NameIdentifier, Credential.UserName),
    new Claim(ClaimTypes.Email, $"{Credential.UserName}@somedomain.com")
};

var identity = new ClaimsIdentity(claims, "MyCookieAuth");
ClaimsPrincipal principal = new ClaimsPrincipal(identity);
Since .NET Core 9 you no longer have to specify the default scheme if you only have one defined (e.g. AAddCookie()or add app.UseAuthentication();, we can do as above - however it is suggested that you should add this according to Microsoft standards. See video 9 (at about 3 minutes in for more details), so our updated code in Program.cs will be:
builder.Services.AddAuthentication("MyCookieAuth")
    .AddCookie("MyCookieAuth", options =>
    {
        options.Cookie.Name = "MyCookieAuth";
        options.LoginPath = "/Account/Login";
        options.AccessDeniedPath = "/Account/AccessDenied";
    });

...

app.UseRouting();

app.UseAuthentication();
app.UseAuthorization();

app.MapStaticAssets();
app.MapRazorPages()
   .WithStaticAssets();

app.Run();
Adding the statement app.UseAuthentication(); explicitly tells the ASP.NET Core pipeline to include the Authentication Middleware to process the contents of the cookie into the security context. This must be added after app.UseRouting() and before any endpoints or app.UseAuthentication() in order to interpret the security context within the HTTP request.
The key points to remember are:
- Use
app.UseAuthentication();to add the middleware to process the security context. - Specify how to process that contect, e.g.
.AddCookie(...) - Specify the authentication scheme name
AddAuthentication("MyCookieAuth")(the logical grouping of everything related to your security context)
The server is now aware of who logged in and what claims they have.
Authorisation Flow Explained
The next step is to check the authorisation of the logged in user. We know who they are, but not what they are allowed to do. Different endpoints may have different authorisation requirements (e.g. Anonymous, must be HR, Must be Admin, Must be Admin and HR, Must be over 18 years old, etc.) These requirements must be specified to access that functionality.
When a request is sent it goes through a pipeline:
flowchart LR
    Br["Browser"]
    Ro[Routing]
    Au[Authentication]
    Az[Authorisation]
    P1[Page 1 - Anonymous]
    P2[Page 2 - Admin]
    P3[Page 3 - HR]
    P4[Page 4 - Admin && HR]
    P5[Page 5 - age > 18]
    Br --> Ro
    Ro --> Au
    Au --> Az
    Az --> P1
    Az --> P2
    Az --> P3
    Az --> P4
    Az --> P5
    P5 -- HTTP-401 Unauthorised --> Az
The Authorisation middleware looks at the claims of the users, the requirements of the endpoint (e.g. Page) and ensures the user claims specify the endpoint requirements.If the requirements are satisfied then we allow access to that endpoint.
In Asp.NET core we have requirement classes and then we can group different requirements together to form a policy. A policy can have one or more requirements:
flowchart TD
    Po["Policy"]
    R1["Requirement 1"]
    R2["Requirement 2"]
    Po --> R1
    Po --> R2
We define these policies in the ConfigureServices method within Program.cs (or Startup.cs in the old format). We apply these policies by using the authorize attribute on the appropriate endpoints.
To handle more complicated checking, like the age > 18 requirement, we have to implement the logic of handling that ourselves. In ASP.Net Core, for each requirement, there has to be a corresponding authorisation handler to handle those requirements.
The authorization middleware uses something that is called IAuthorizationService, much like the authentication middleware uses IAuthenticationService.
The implementation of the authorization service will look through all of the requirements, and finds corresponding handlers to handle each requirement. Each requirement must have a corresponding handler for checking the presence of the claims. The generic handlers cover most situations, but for handlers that need particular logic you must implement an appropriate handler yourself.
flowchart LR
    IAs[IAuthorizationService]
    R1Ah["Requirement 1 Auth Handler"]
    R1["Requirement 1"]
    R2["Requirement 2"]
    Po["Policy"]
    Br["Browser"]
    Ro[Routing]
    Au[Authentication]
    Az[Authorisation]
    P1[Page 1 - Anonymous]
    P2[Page 2 - Admin]
    P3[Page 3 - HR]
    P4[Page 4 - Admin && HR]
    P5[Page 5 - age > 18]
    IAs ---> R1Ah
    R1Ah --> R1
    Po --> R1
    Po --> R2
    Az --> Po
    Br --> Ro
    Ro --> Au
    Au --> Az
    Az --> P1
    Az --> P2
    Az --> P3
    Az --> P4
    Az --> P5
    P5 -- HTTP-401 Unauthorised --> Az
After Routing and Authorisation we know which endpoint we are trying to hit and have all the user claims, the authorisation step checks the user meets the requirements to access that endpoint.
Implementing the Authorisation Flow
Require an Authenticated User
The simplest requirement we can add is to deny anonymous user access, to a page (for example). Adding this to a page is as simple as adding the [Authorize] attribute to the code behind of the page and referencing its namespace Microsoft.AspNetCore.Authorization:
using Microsoft.AspNetCore.Authorization;
using Microsoft.AspNetCore.Mvc.RazorPages;

namespace WebApp_UnderTheHood.Pages
{
    [Authorize]
    public class IndexModel : PageModel
    {
        public void OnGet()
        {

        }
    }
}
The [Authorize] attribute works with the authorisation middleware which simply denies access to the page to any anonymous identity.
Running our web app now immediately redirects us from the homepage to the login page, as we set the login path when we added authentication in Program.cs:
builder.Services.AddAuthentication("MyCookieAuth")
    .AddCookie("MyCookieAuth", options =>
    {
        options.Cookie.Name = "MyCookieAuth";
        options.LoginPath = "/Account/Login";
    });
The default location for a login page also matches our path of /Account/Login, so we didn't technically need to specify this as it should automatically navigate to this page, but it's better to specify this explicitly in case your login page is at a different location which would result into a 404 response code otherwise.
After we log in the page will be accessible as expected.
Creating a Policy to Require a Specific (Simple) Claim
If we want to restrict our page to an identity that has a specific claim (key/value pair) this is quite simple.
We are going to add a new page that we only want people who are in the Human Resources (HR) department to have access to. In order to do this we need to configure a new policy. Policies are related to the authorisation middleware, so we need to configure this in Program.cs. After we configure the Authentication middleware (builder.Services.AddAuthentication("MyCookieAuth") ...) we can add:
builder.Services.AddAuthorization(options =>
{
    options.AddPolicy("MustBelongToHRDepartment", policy =>
    {
        policy.RequireClaim("Department", "HR");
    });
});
This adds a new policy called "MustBelongToHRDepartment" that requires the "Department" claim to be present and have a value of "HR".
To see how this is used add a new Empty Razor Page to the folder /Pages called HumanResource. Edit the HTML to look like this:
@page
@model WebApp_UnderTheHood.Pages.HumanResourceModel
@{
}

<div class="text-center">
    <h1 class="display-4">Human Resources</h1>
</div>
Then in the code-behind (the model) we can add the Authorize attribute again and set this policy as a parameter:
using Microsoft.AspNetCore.Authorization;
using Microsoft.AspNetCore.Mvc.RazorPages;

namespace WebApp_UnderTheHood.Pages;

[Authorize(Policy = "MustBelongToHRDepartment")]
public class HumanResourceModel : PageModel
{
    public void OnGet()
    {
    }
}
This basically tells the authorisation middleware to apply the specified policy implementation to this endpoint (along with the base Authorised user only condition). If the claim is missing or the value is incorrect then access is rejected.
Currently, our Login code-behind only specifies a Name and Email claim, so if we try to access this page we will be rejected:
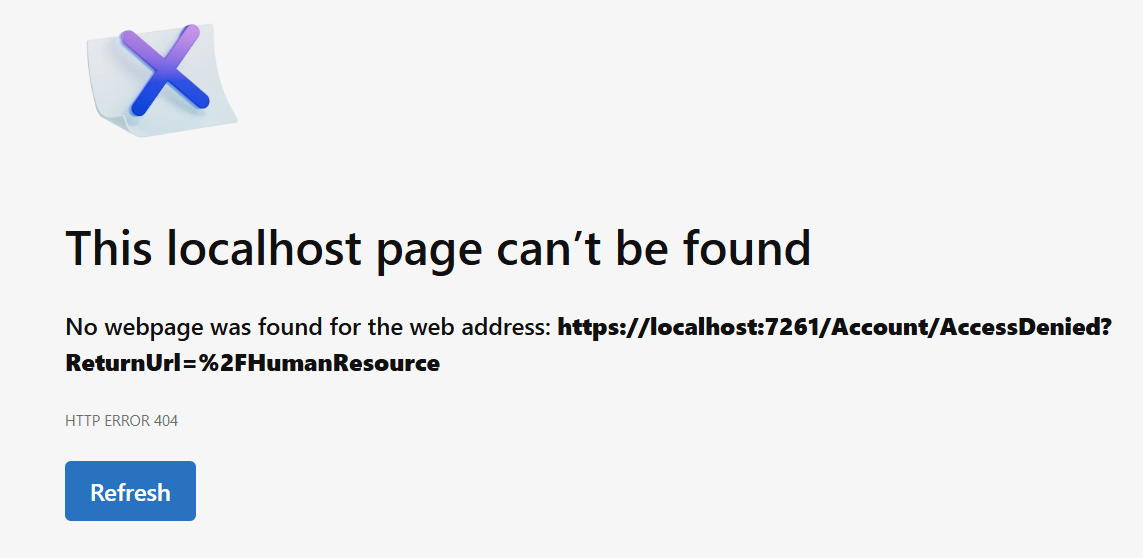
Behind the scenes an HTTP response code of 403 - Challenge was returned, which means the user was logged in and the authentication ticket is present, but the user does not have the correct permissions to access the resource.
The error shows an HTTP code of 404 - Not found. This is because the authorisation middleware on receiving the 403 response is trying to redirect us to the page /Account/AccessDenied as shown in the image above, which is the default access denied page that does not exist, hence the 404.
The default location can be modified in the same place as the Login page if you want to change this from the default location:
builder.Services.AddAuthentication("MyCookieAuth")
    .AddCookie("MyCookieAuth", options =>
    {
        options.Cookie.Name = "MyCookieAuth";
        options.LoginPath = "/Account/Login";
        options.AccessDeniedPath = "/Account/AccessDenied";
    });
We can just create a new empty Razor page in the default location and implement as this:
AccessDenied.cshtml:
@page
@model WebApp_UnderTheHood.Pages.Account.AccessDeniedModel
@{
}

<div class="text-center">
    <h1 class="display-4">Access Denied</h1>
    <p class="lead">You do not have permission to access this resource.</p>
</div>
Now when we run the application again we will get successfully redirected to this AccessDenied page.
To gain access to this page we can add ther required claim and value to the login page code:
var claims = new List<Claim>
{
    new Claim(ClaimTypes.NameIdentifier, Credential.UserName),
    new Claim(ClaimTypes.Email, $"{Credential.UserName}@somedomain.com"),
    new Claim("Department", "HR")  // Custom claim for authorisation policy.
};
Now when we run the app, delete the auth cookie (to flush out the old claims list) and navigate to the page it will display correctly.
Checking for the Presence of a Claim (Not the Value)
If you just want to check if a Claim is present in the security identity, rather than the actual valuer of that claim, this is simple.
Suppose we have a settings page that only Admins can access. Create a new page /Pages/Settings as an empty Razor page, and edit as follows:
Settings.cshtml:
@page
@model WebApp_UnderTheHood.Pages.SettingsModel
@{
}

<div class="text-center">
    <h1 class="display-4">Settings</h1>
    <p>Here you can change your settings.</p>
</div>
For Settings.cshtml.cs just add the Authorize attribute as follows:
using Microsoft.AspNetCore.Authorization;
using Microsoft.AspNetCore.Mvc.RazorPages;

namespace WebApp_UnderTheHood.Pages;

[Authorize(Policy = "AdminOnly")]
public class SettingsModel : PageModel
{
    public void OnGet()
    {
    }
}
Now back in Program.cs amend the following code to add the new policy (the order in the list is irrelevant, the name just needs to be unique):
builder.Services.AddAuthorization(options =>
{
    options.AddPolicy("MustBelongToHRDepartment", policy =>
    {
        policy.RequireClaim("Department", "HR");
    });
    options,AddPolicy("AdminOnly", policy =>
    {
        policy.RequireClaim("Admin"); // Just require the presence of the claim
    });
});
Now edit the login page to add this claim:
var claims = new List<Claim>
{
    new Claim(ClaimTypes.NameIdentifier, Credential.UserName),
    new Claim(ClaimTypes.Email, $"{Credential.UserName}@somedomain.com"),
    new Claim("Department", "HR"),  // Custom claim for authorisation policy.
    new Claim("Admin", "true")  // Custom claim for admin. Value can be anything, but good to have it make sense.
};
As usual you will need to clear the existing cooke to teat this works (but don't to check the gatekeeping first!)
Checking for Multiple Claims
If we are checking for multiple claims with a relationship between them we can demonstrate this with another page. Create a new empty Razor page HrManager:
HrManager.cshtml:
@page
@model WebApp_UnderTheHood.Pages.HrManagerModel
@{
}

<div class="text-center">
    <h1 class="display-4">Human Resources</h1>
    <p>Welcome to Human Resources Management.</p>
</div>
HrManager.cshtml.cs:
using Microsoft.AspNetCore.Authorization;
using Microsoft.AspNetCore.Mvc.RazorPages;

namespace WebApp_UnderTheHood.Pages;

[Authorize(Policy = "HRManagerOnly")]
public class HrManagerModel : PageModel
{
    public void OnGet()
    {
    }
}
Now configure this in Program.cs:
builder.Services.AddAuthorization(options =>
{
    options.AddPolicy("MustBelongToHRDepartment", policy =>
    {
        policy.RequireClaim("Department", "HR");
    });
    options.AddPolicy("AdminOnly", policy =>
    {
        policy.RequireClaim("Admin");
    });
    options.AddPolicy("HRManagerOnly", policy =>
    {
        policy.RequireClaim("Department", "HR")
              .RequireClaim("Manager");
    });
});
Update the login code:
var claims = new List<Claim>
{
    new Claim(ClaimTypes.NameIdentifier, Credential.UserName),
    new Claim(ClaimTypes.Email, $"{Credential.UserName}@somedomain.com"),
    new Claim("Department", "HR"),  // Custom claim for authorisation policy.
    new Claim("Admin", "true"),  // Custom claim for admin. Value can be anything, but good to have it make sense.
    new Claim("Manager", "true")  // Custom claim for manager. Value can be anything, but good to have it make sense.
};
Test in the usual way (Run as-is to confirm rejection, delete cookie, log back in and check access is granted).
Logout Functionality
In the login page we call a method to sign in:
await HttpContext.SignInAsync("MyCookieAuth", principal);
This creates a cookie and uses it to wrap around the security context.
There is also a SignOutAsync() method for implementing the logout functionality.
Just as we have a login page to login, we will need a logout page to logout by calling HttpContext.LogOutAsync(). The logout page should be added to the Account folder alongside the Login page. We will call this Logout and create in the usual manner:
We don't need to amend the Logout.cshtml page as when called it will just run the code-behind and navigate directly back to the index page, but would could put a logged-out message here if we wanted to without the automatic redirection:
@page
@model WebApp_UnderTheHood.Pages.Account.LogoutModel
@{
}
For the code-behind we just need to implement the OnPostAsync() method with the scheme name ("MyCookieAuth") as the parameter (really this should always be kept in a constant).
Logout.cshtml.cs:
using Microsoft.AspNetCore.Authentication;
using Microsoft.AspNetCore.Mvc;
using Microsoft.AspNetCore.Mvc.RazorPages;

namespace WebApp_UnderTheHood.Pages.Account
{
    public class LogoutModel : PageModel
    {
        public async Task<IActionResult> OnPostAsync()
        {
            await HttpContext.SignOutAsync("MyCookieAuth");
            return RedirectToPage("/Index");
        }
    }
}
With this implemented we need somewhere to trigger it. This is often done in the top of the window. A good way to approach this is to wrap the markup in a partial view that displays a login or logout button depending on the current authentication state. Take a copy of Pages/Shared/_ValidationScriptsPartial.cshtml and paste back into that folder renamed as _LoginStatusPartial.cshtml. Remove the two scripts lines and write the following logic:
@if (User is not null
     && User.Identity is not null
     && User.Identity.IsAuthenticated)
{
    <text>
        Hello, @User.Identity.Name
        <form method="post" class="form-inline" asp-page="/Account/Logout">
            <button type="submit" class="ml-2 btn btn-link navbar-btn">Logout</button>
        </form>
    </text>
}
else
{
    <a class="btn btn-link" asp-page="/Account/Login">Login</a>
}
Notice this has a form of type post to match with our code-behind method on the logout page.
We now add this partial view to the _Layout page _Layout.cshtml in the <header> region:
<header>
    <nav class="navbar navbar-expand-sm navbar-toggleable-sm navbar-light bg-white border-bottom box-shadow mb-3">
        <div class="container">
            <a class="navbar-brand" asp-area="" asp-page="/Index">WebApp_UnderTheHood</a>
            <button class="navbar-toggler" type="button" data-bs-toggle="collapse" data-bs-target=".navbar-collapse" aria-controls="navbarSupportedContent"
                    aria-expanded="false" aria-label="Toggle navigation">
                <span class="navbar-toggler-icon"></span>
            </button>
            <div class="navbar-collapse collapse d-sm-inline-flex justify-content-between">
                <ul class="navbar-nav flex-grow-1">
                    <li class="nav-item">
                        <a class="nav-link text-dark" asp-area="" asp-page="/Index">Home</a>
                    </li>
                    <li class="nav-item">
                        <a class="nav-link text-dark" asp-area="" asp-page="/Privacy">Privacy</a>
                    </li>
                </ul>
            </div>
            <div class="mr-2">
                <partial name="_LoginStatusPartial" />
            </div>
        </div>
    </nav>
</header>
The lines we added are:
<div class="mr-2">
    <partial name="_LoginStatusPartial" />
</div>
Now we can run and test this.
Every time we logout the cookie is deleted, we then no longer have a security context and we are essentially logged out.
A More Complex Check
Suppose you only want to grant access to a page when the user meets the following criteria:
- Is a member of HR.
- Is an Admin.
- Has passed 6 month security clearance.
To see how we would do this, add the following to the claims on the Login.cshtml.cs file:
new Claim("EmploymentDate", DateTime.UtcNow.AddYears(-1).ToString("yyyy-MM-dd"))
Create a new class in the /Authorization folder named HrManagerProbationRequirement and implement the following:
using Microsoft.AspNetCore.Authorization;

namespace WebApp_UnderTheHood.Authorization;

public class HrManagerProbationRequirement : IAuthorizationRequirement
{
    public HrManagerProbationRequirement(int probationMonths)
    {
        ProbationMonths = probationMonths;
    }

    public int ProbationMonths { get; }
}

public class HrManagerProbationRequirementHandler : AuthorizationHandler<HrManagerProbationRequirement>
{
    protected override Task HandleRequirementAsync(AuthorizationHandlerContext context, HrManagerProbationRequirement requirement)
    {
        if (!context.User.HasClaim(c => c.Type == "EmploymentDate"))
        {
            return Task.CompletedTask;
        }

        if (DateTime.TryParse(context.User.FindFirst(c => c.Type == "EmploymentDate")?.Value, out DateTime employmentDate))
        {
            var monthsEmployed = ((DateTime.UtcNow.Year - employmentDate.Year) * 12) + DateTime.UtcNow.Month - employmentDate.Month;

            if (monthsEmployed >= requirement.ProbationMonths)
            {
                context.Succeed(requirement);
            }
        }

        return Task.CompletedTask;
    }
}
All custom requirements have to implement the IAuthorizationRequirement interface and a handler of AuthorizationHandler that is a generic type of IAuthorizationRequirement as just mentioned.
With this in place we need to register the requirement and handler, and add this new requirement to our target endpoint, in this cae the HrManager page. We already have the HRManagerOnly policy on that page, so we can add our requirement to this along with the registration for dependency injection.
Update Program.cs:
builder.Services.AddAuthorization(options =>
{
    options.AddPolicy("MustBelongToHRDepartment", policy =>
    {
        policy.RequireClaim("Department", "HR");
    });
    options.AddPolicy("AdminOnly", policy =>
    {
        policy.RequireClaim("Admin");
    });
    options.AddPolicy("HRManagerOnly", policy =>
    {
        policy.RequireClaim("Department", "HR")
              .RequireClaim("Manager")
              .Requirements.Add(new HrManagerProbationRequirement(3)); // 3 months probation requirement
    });
});

builder.Services.AddSingleton<IAuthorizationHandler, HrManagerProbationRequirementHandler>();
(Rather than passing in a constant of 3 here, this would probably be better as a constant or setting value)
Now the policy has been amended to include this new requirement.
We can also add the HR MAnager page to the menu above the Privacy section in _Layout.cshtml:
<li class="nav-item">
    <a class="nav-link text-dark" asp-area="" asp-page="/HrManager">HR Manager</a>
</li>
Cookie Lifetime and Browser Session
After the login completes the cookie is generated as an authentication ticket. This cookie may or may not have an expiry date and time set, which is also affected by the browser session.
We can define the expiry from within Program.cs where the AddCookie() method call creates the cookie, via the field ExpireTimeSpan which takes a TimeSpan object. For testing it is good to dset this to a short value.
builder.Services.AddAuthentication("MyCookieAuth")
    .AddCookie("MyCookieAuth", options =>
    {
        options.Cookie.Name = "MyCookieAuth";
        options.LoginPath = "/Account/Login";
        options.AccessDeniedPath = "/Account/AccessDenied";
        options.ExpireTimeSpan = TimeSpan.FromSeconds(20);
    });
The cookie will still appear in the DevTools pane of the browser after expiry, but the expiry time is encoded in that cookie.
However, with this set if you close and re-open a new instance of the browser, the cookie is deleted even if the expiry time has not been hit.
The cookie lifetime is dependant on the browser session AND the expiry time. We can however define the cookie as persistent which will keep the cookie over multiple browser sessions until the expiry time is hit. This is how things like "Remember Me" checkboxes on a login screen are implemented,m via persistent cookies. To implement this:
In Login.cshtml.cs update the Credential class by adding the RememberMe field:
public class Credential
{
    [Required]
    [Display(Name = "User Name")]
    public string UserName { get; set; } = string.Empty;

    [Required]
    [DataType(DataType.Password)]
    public string Password { get; set; } = string.Empty;

    [Display(Name = "Remember Me")]
    public bool RememberMe { get; set; }
}
Then add this to the form itself in Login.cshtml above the submit <div>:
<div class="row mb-3 form-check">
    <div class="col-2">
        <input type="checkbox" asp-for="Credential.RememberMe" class="form-check-input" />
        <label asp-for="Credential.RememberMe" class="form-check-label"></label>
    </div>
    <div class="col-5">
    </div>
</div>
With the UI in place we can update the SignInAsync() method call to use this and set a time after which login will be required regardless:
var authProperties = new AuthenticationProperties
{
    IsPersistent = Credential.RememberMe,
    ExpiresUtc = Credential.RememberMe ? DateTimeOffset.UtcNow.AddMinutes(2) : null
};

// Encrypt the principal
await HttpContext.SignInAsync("MyCookieAuth", principal, authProperties);
And remove the options.ExpireTimeSpan = xxx; from Program.cs as setting this overrides the IsPersistent setting and keeps the cookie alive until expired regardless. (this may not be true as I wasn't closing all windows, so the expiry time might be good to stay, and the ExpiresUtc field may not be needed to set the expiration time).
With the expiry time set long enough to allow a few sessions, we can now test this works.